2.2. Managing a School Profile
2.2.1. Editing School Information
2.2.1.1. General Information
This tab provides access to school details such as school name, contact details, address, and other attributes related to registrars and curricula:
- Sign in to eSIS.
- From the left-side menu, select "Schools".
- Expand the menu under "Schools" and click on "School Details".
- Choose the target school from the list of schools.
- Navigate to the "School General Information" tab.
- Make the necessary changes.
- Click on "Save" to save the changes.
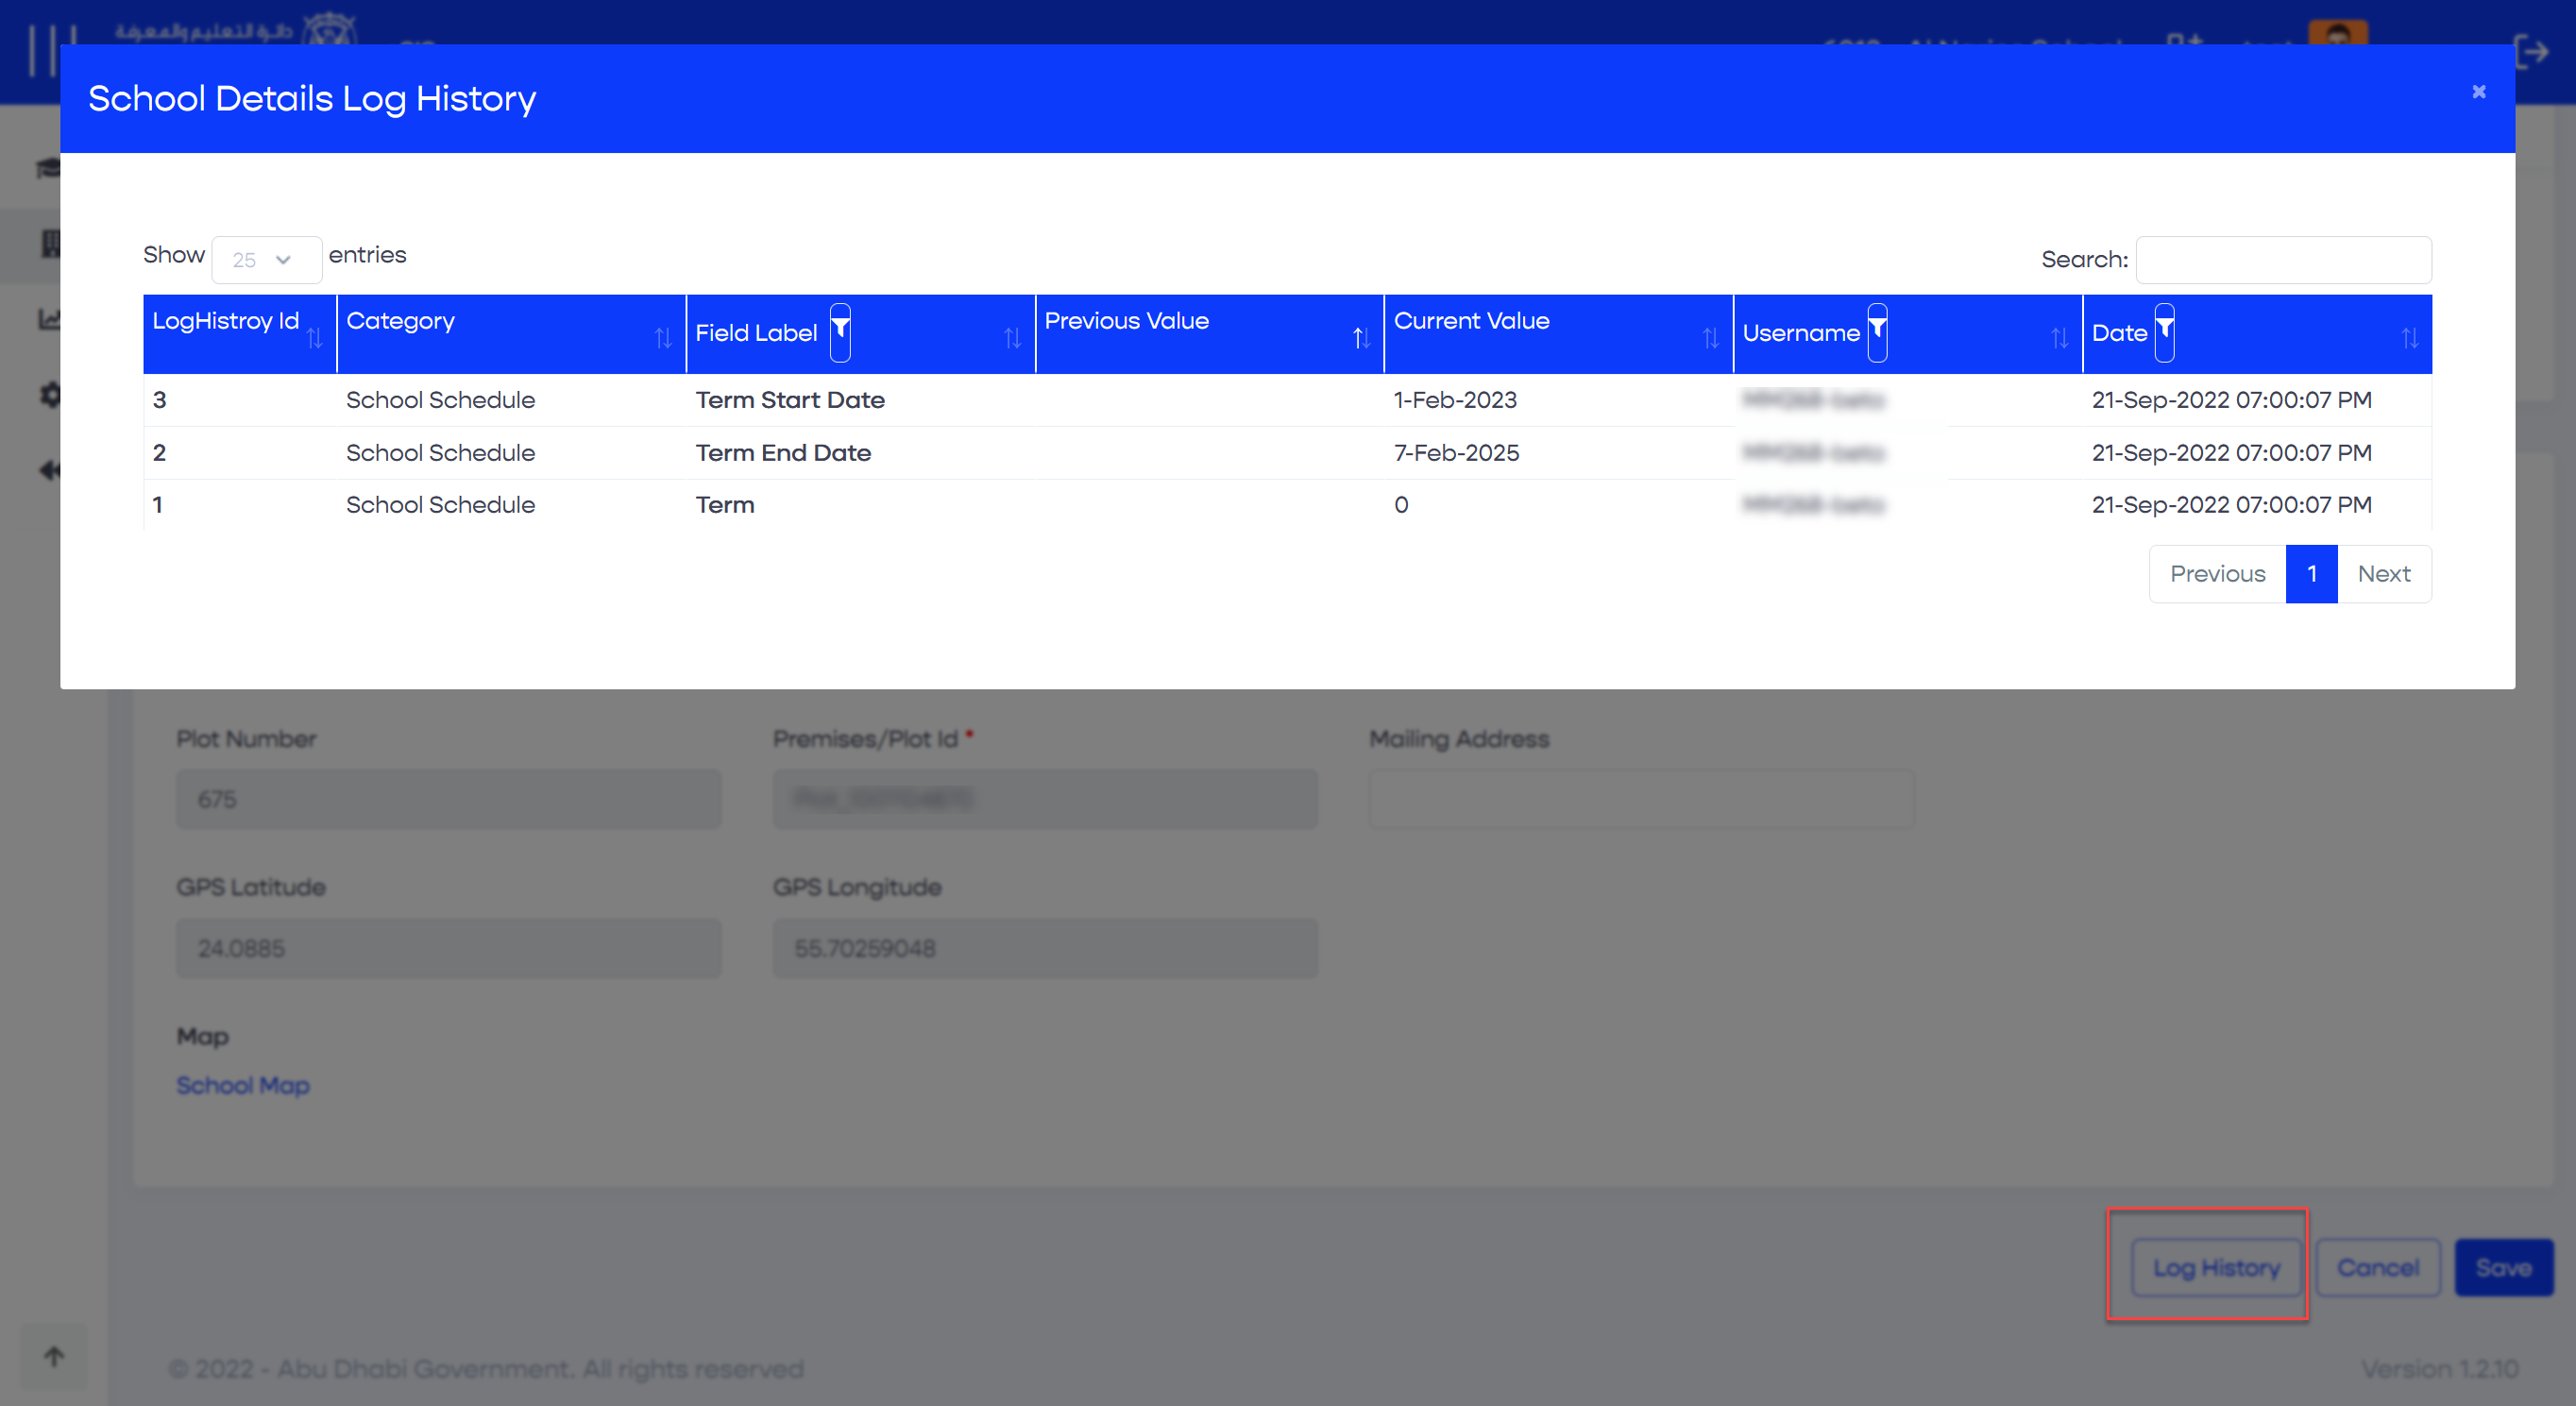
2.2.1.1.1. History Log
Within this popup, you will have the ability to view all transactions performed related to the school's basic information. It displays the following details:
- Action date
- Action username
- Updated field (previous and new value)
2.2.1.2. School Configurations
2.2.1.2.1. Defining the Academic Year
- Sign in to eSIS.
- From the left-side menu, select "Schools".
- Expand the menu under "Schools" and click on "School Details".
- Choose the target school from the list of schools.
- Navigate to the "School Configurations" tab.
- Go to the "Registration" section.
- Click on the current academic year to define the existing year or click "Next" to define the next academic year.
- Click on "Save" to save the changes.

2.2.1.2.2. Defining Capacity
- Sign in to eSIS.
- From the left-side menu, select "Schools".
- Expand the menu under "Schools" and click on "School Details".
- Choose the target school from the list of schools.
- Navigate to the "School Configurations" tab.
- Go to the "Capacity" section.
- Make the required changes.
- Click the "Save" button.
Admin users can update the licensed capacity and the maximum number of homerooms when checking the "Current Academic Year". School users can view this information as read-only.
Info
Students admitted to the Autism Resource Base (ARB) will be excluded from the school capacity counter.
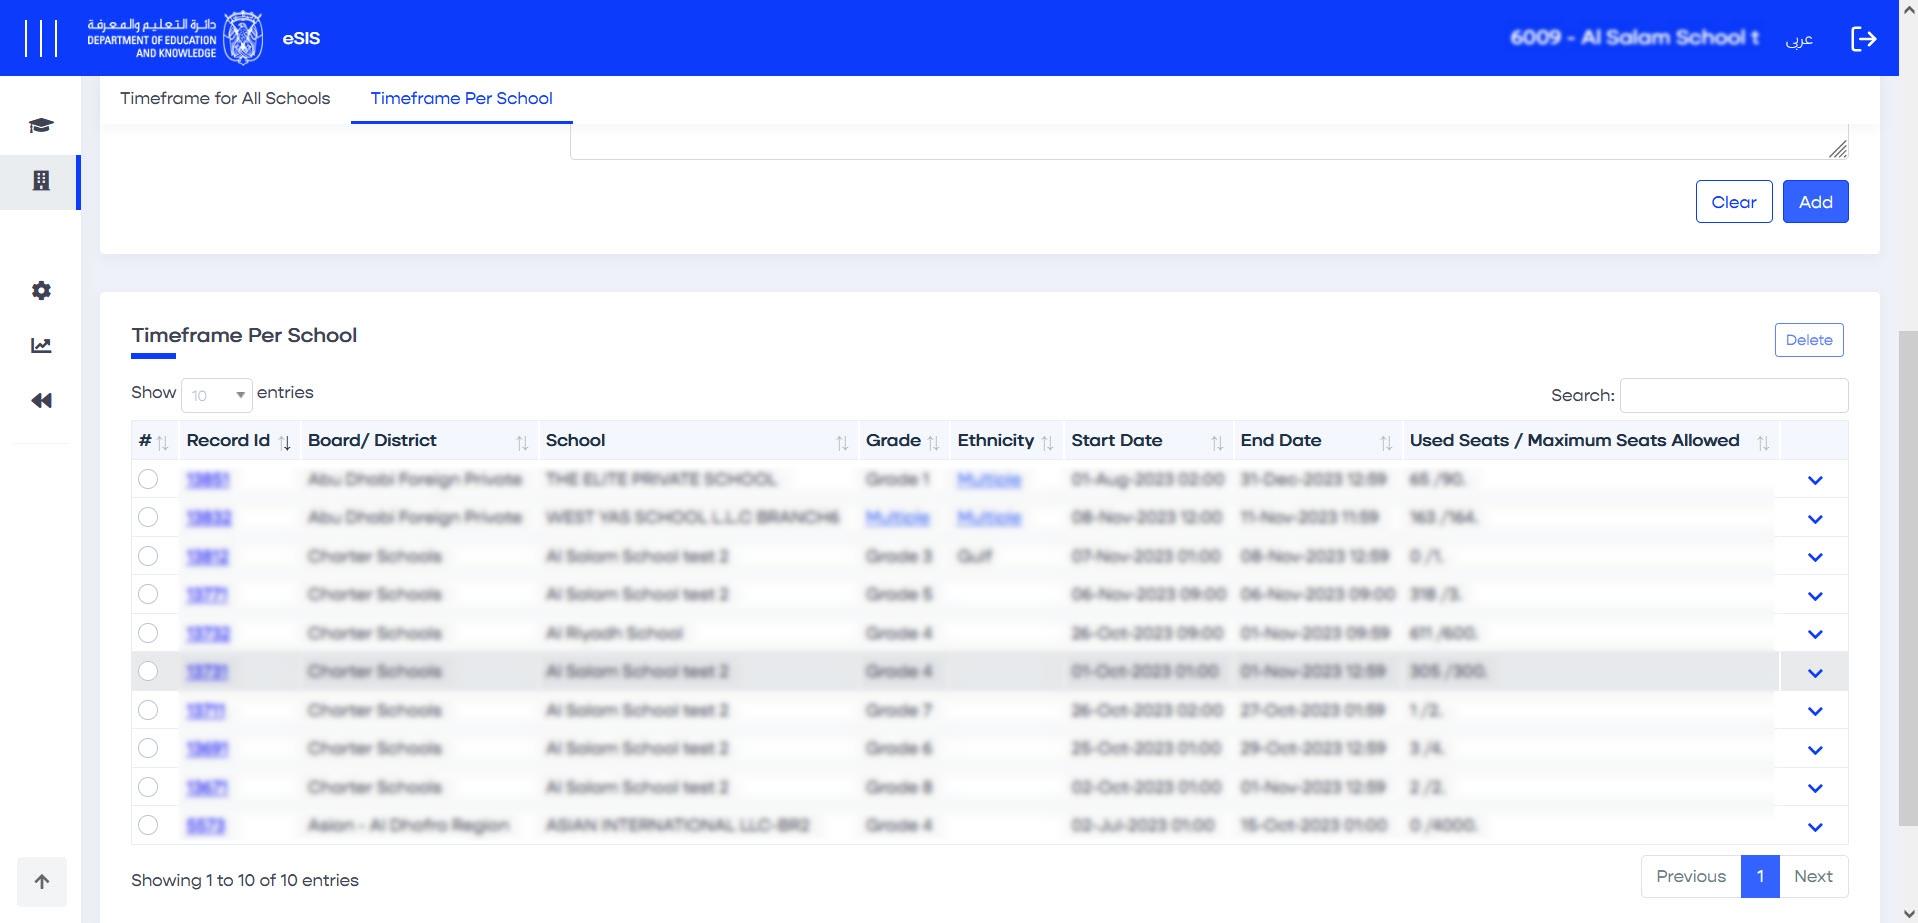
2.2.1.3. Defining Timeframes
As a system administrator, you have the authority to manage the registration time frames for educational districts. This feature allows you to set the open and closed registration periods on a wide scale for both the current and next academic years. This capability ensures efficient and coordinated registration processes across different districts:
- Sign in to eSIS.
- From the left-side menu, select "Schools".
- Select "Enrollment" and then click on "Registration Time frames".
- Choose the academic year you want (current or next).
- Fill in the necessary timeframe information.
- Use checkboxes to indicate where this timeframe should apply.
- Click "Add" to save the new timeframe and publish it.
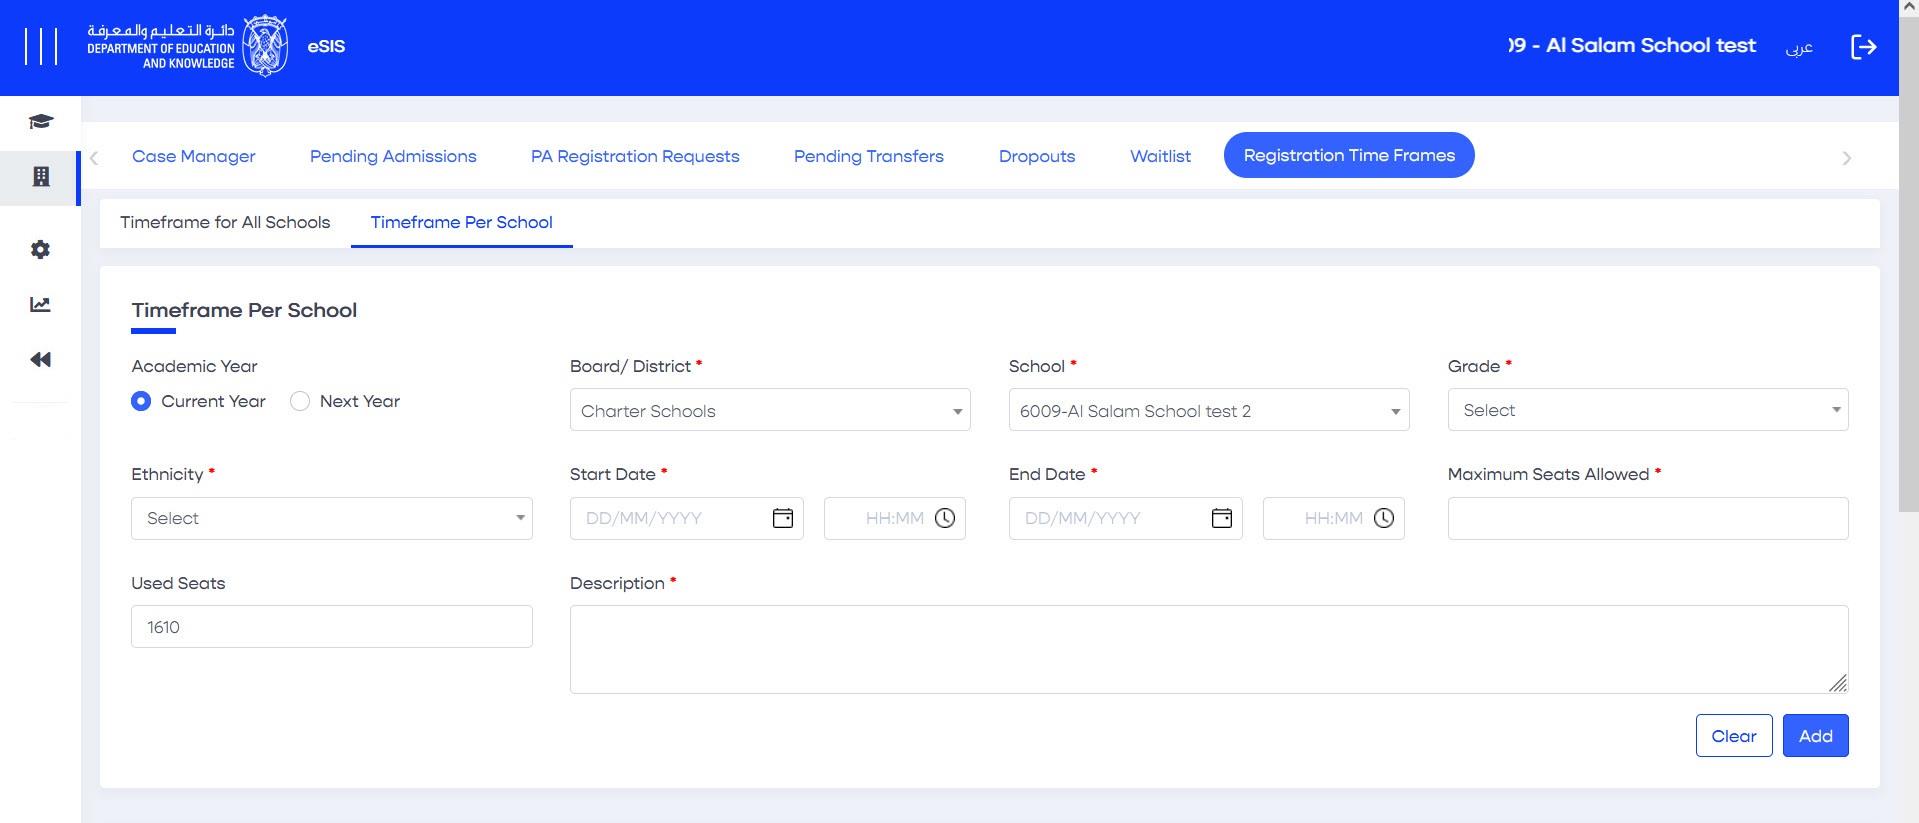
Info
If you try to register a student out of the timeframe, the system will give you an error message.

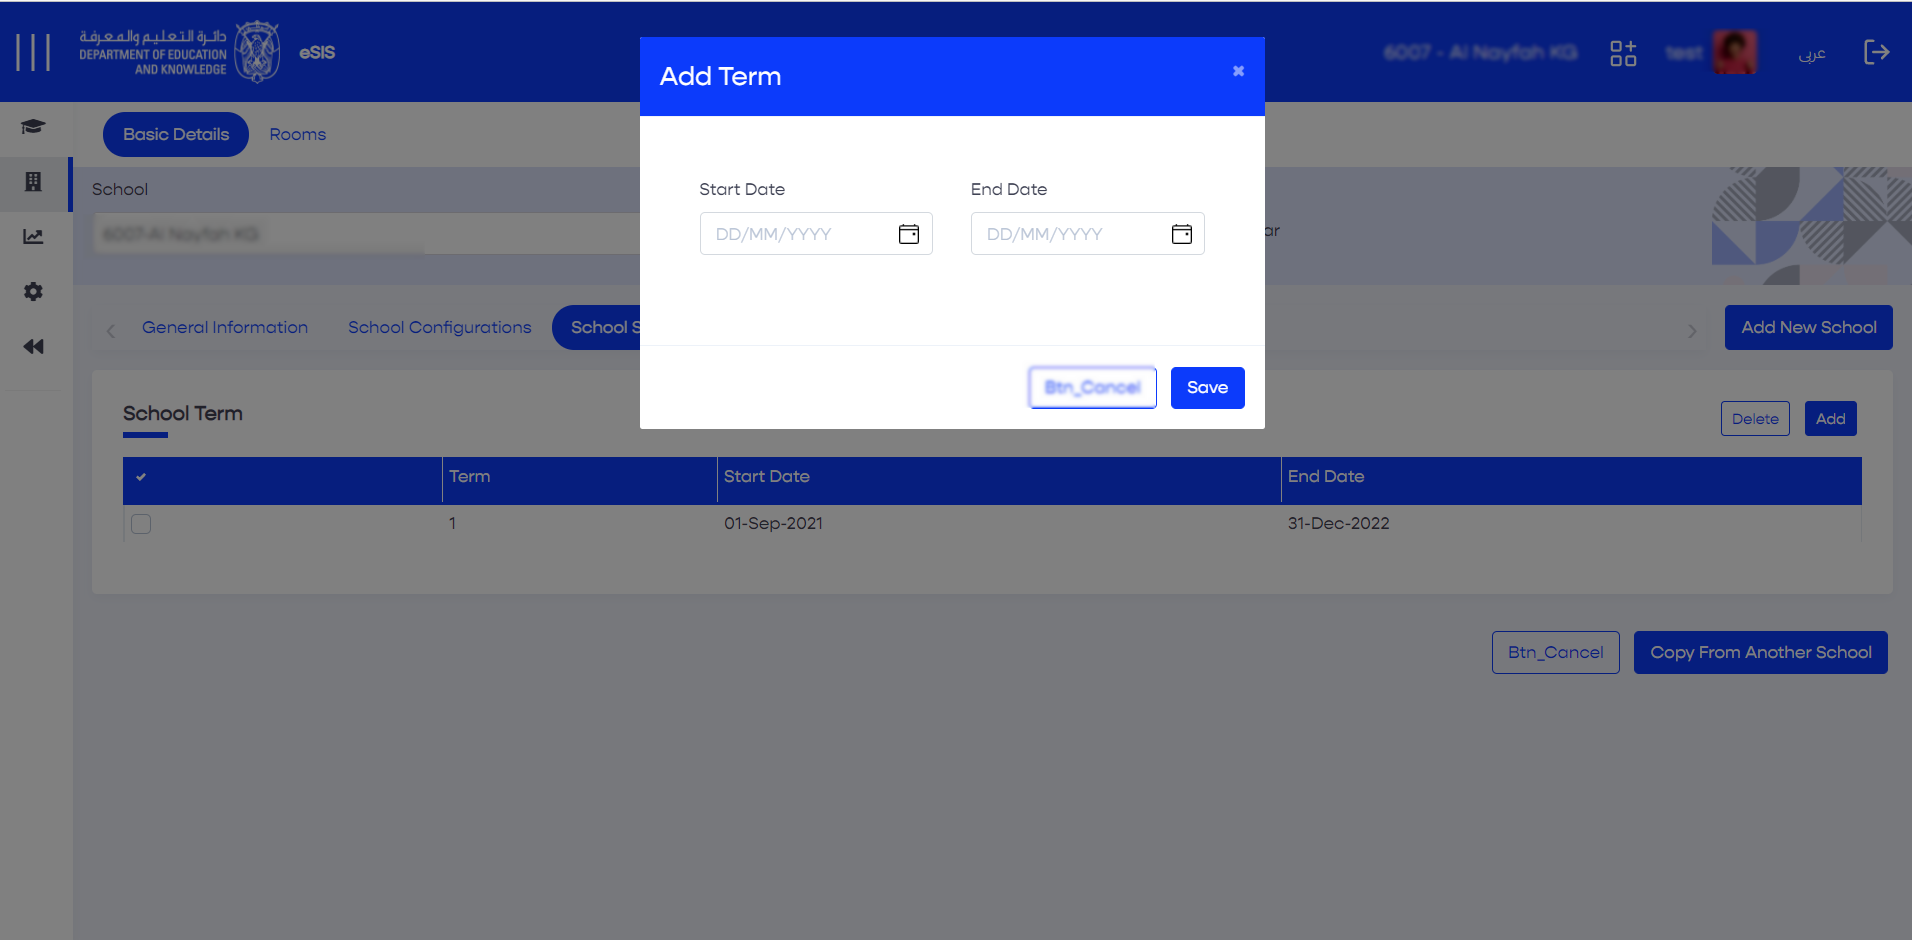
2.2.1.4. Defining the School Schedule
2.2.1.4.1. Adding a New Term
- Sign in to eSIS.
- From the left-side menu, select "Schools".
- Expand the menu under "Schools" and click on "School Details".
- Choose your school from the list.
- Navigate to the "School Schedule" section.
- Click on "Add" in the top-right corner.
- Define the start and end date for the schedule.
- Click "Save" to save the changes.
2.2.1.4.2. Deleting the Existing Term
- Sign in to eSIS Beta.
- From the left-side menu, select "Schools".
- Expand the menu under "Schools" and click on "School Details".
- Choose your school from the list.
- Navigate to the "School Schedule" section.
- Select the term you want to delete.
- Click on "Delete" in the top-right corner.
- Click "Save" to save the changes.
2.2.1.4.3. Copying the Existing Term to Other Schools
- Sign in to eSIS.
- From the left-side menu, select "Schools".
- Expand the menu under "Schools" and click on "School Details".
- Choose your school from the list.
- Navigate to the "School Schedule" section.
- From the bottom-right corner, click on "Copy From Another School".
- Choose the school you want to copy from.
- Click "Save" to save the changes.
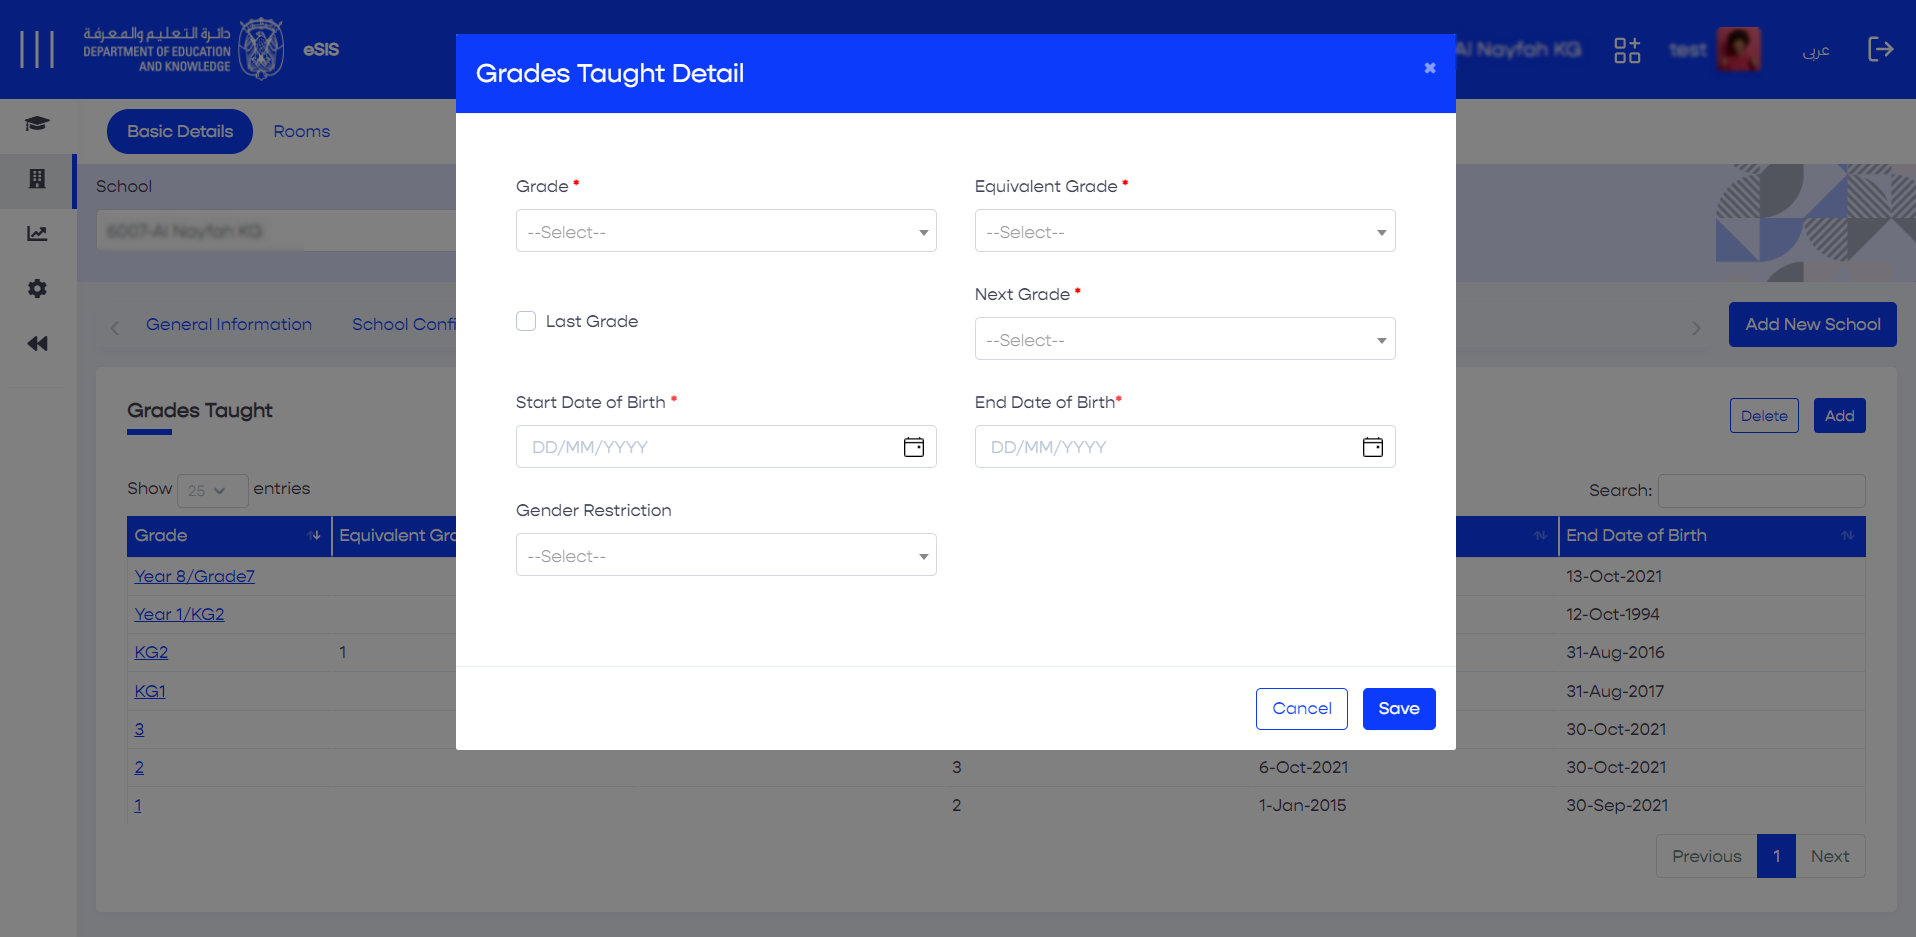
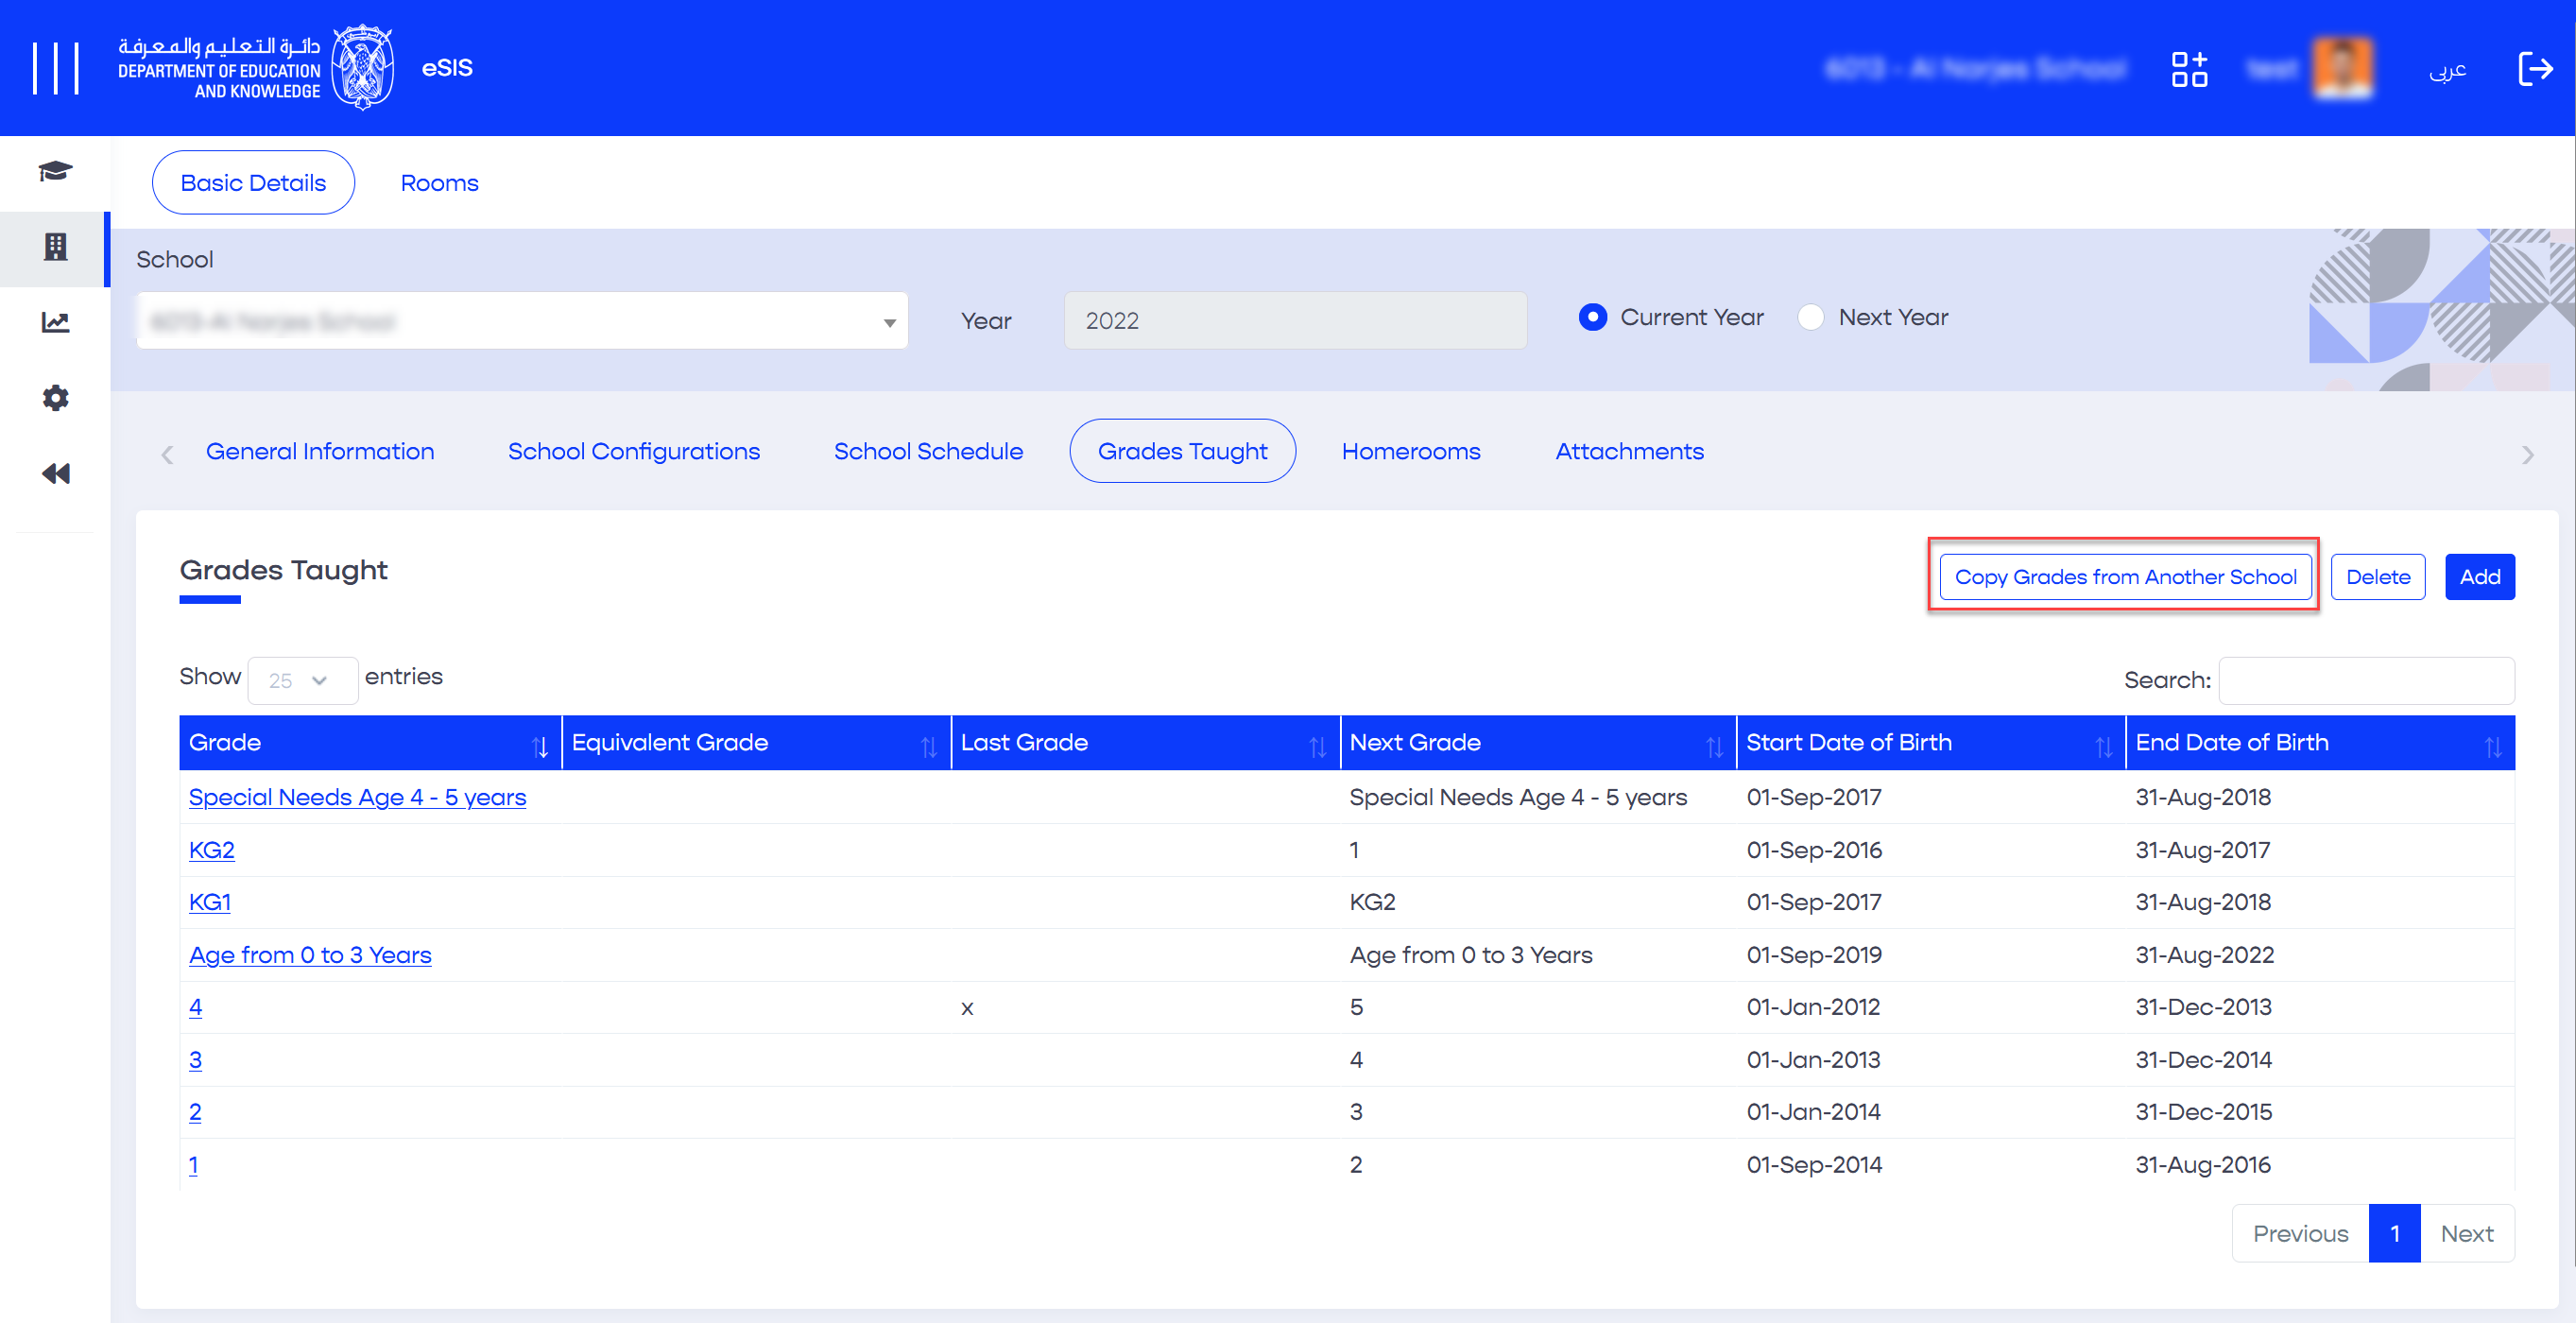
2.2.1.5. Defining the Grades Taught
2.2.1.5.1. Adding Grades
- Sign in to eSIS.
- From the left-side menu, select "Schools".
- Expand the menu under "Schools" and click on "School Details".
- Choose your school from the list.
- Navigate to the "Grades Taught" section, where you can view the grades being taught in the selected school.
- From the top-right corner, click on "Add" to add a new grade.
- In the "Grade Taught Details" section, provide the details, including:
- Equivalent Grade
- Next Grade
- Start and End Date of Birth
- Gender Restrictions (if applicable)
Click "Save" to save the changes.
Info
If a grade does not have a next grade entry, you can designate it as the "Last Grade".
2.2.1.5.2. Deleting Grades
- Sign in to eSIS.
- From the left-side menu, select "Schools".
- Expand the menu under "Schools" and click on "School Details".
- Choose your school from the list.
- Navigate to the "Grades Taught" section, where you can view all the grades being taught in the selected school.
- Select the desired grade record.
- Click on "Delete" from the top-right corner.
2.2.1.5.3. Editing Grades
- Sign in to eSIS.
- From the left-side menu, select "Schools".
- Expand the menu under "Schools" and click on "School Details".
- Choose your school from the list.
- Navigate to the "Grades Taught" section, where you can view all the grades being taught in the selected school.
- Locate and click on the desired grade record.
- Edit the grade information.
- Click "Save" to save the changes.
2.2.1.5.4. Copying Grades from Another School
- Sign in to eSIS.
- From the left-side menu, choose "Schools" and then select "School Details".
- Navigate to the "Grades Taught" tab.
- Click on the "Copy Grades from Another School" button.
- A popup will appear, where you can fill in the source and target district schools.
- Select the desired grades.
- Click the "Save" button to initiate the grade copying process.
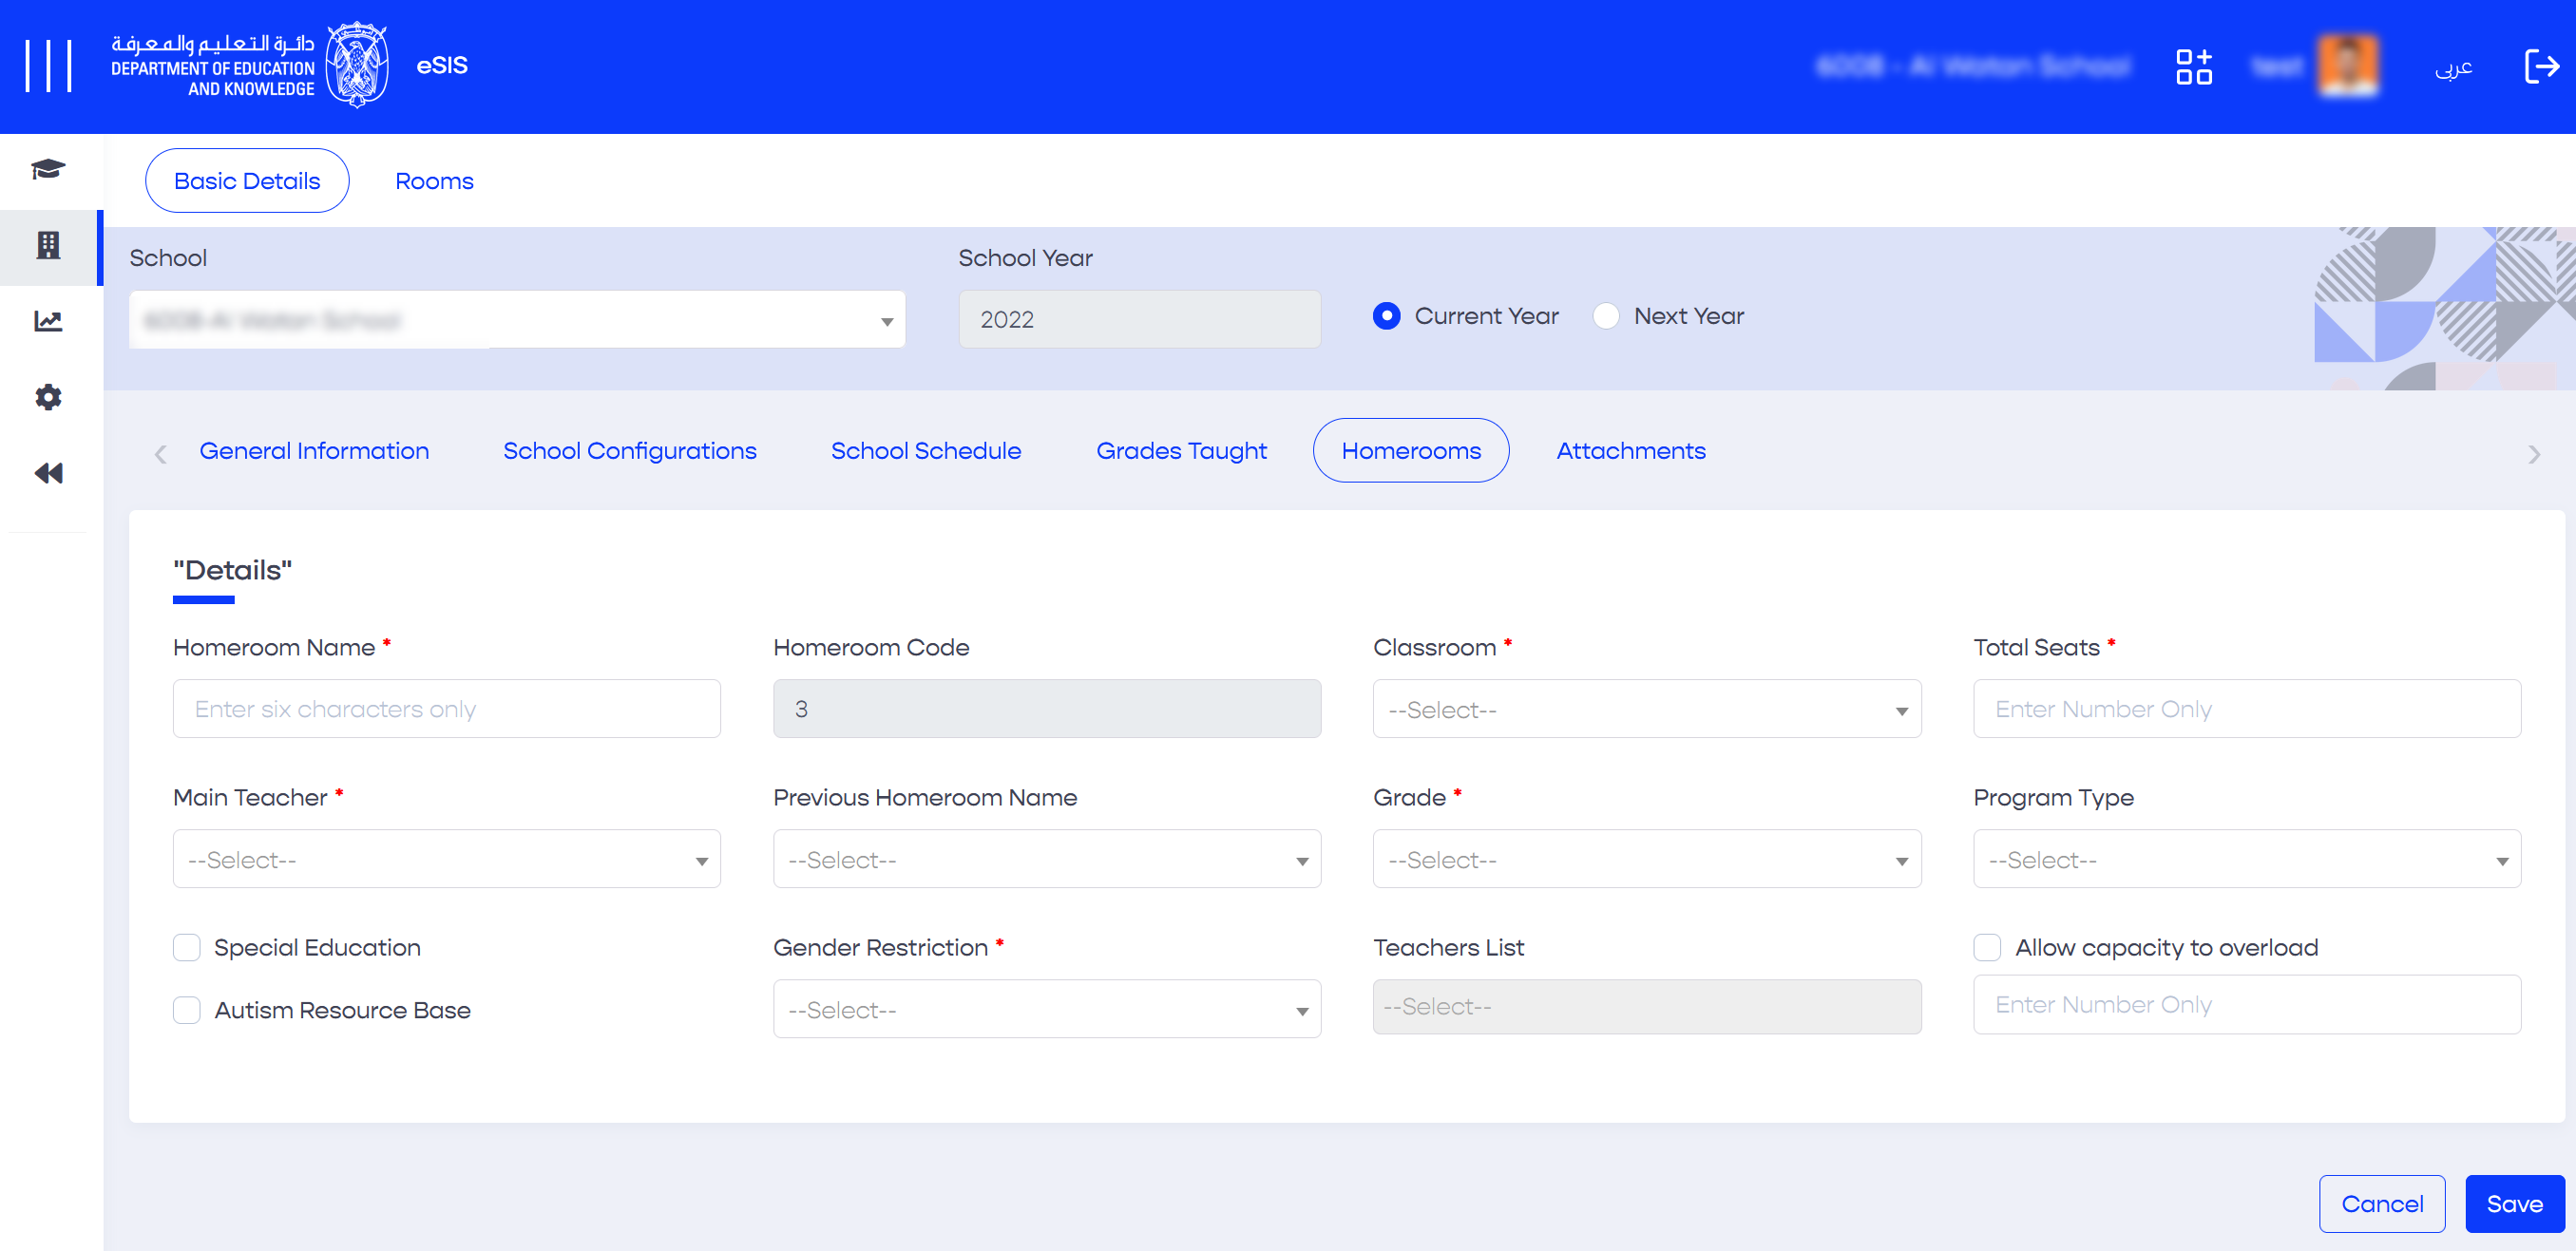
2.2.1.6. Defining Homerooms
This feature allows you to manage homerooms, such as importing homeroom details and assigning students to homerooms using multiple methods, including mass assignment by attribute and mass assignment by Excel.

2.2.1.6.1. Adding Homerooms
- Sign in to eSIS.
- From the left-side menu, select "Schools".
- Expand the menu under "Schools" and click on "School Details".
- Choose your school from the list.
- Navigate to the "Homerooms" section.
- From the top-right corner, click on "Add".
- Fill in the homeroom information.
- Click "Save" to save the homeroom details.
Info
The system validates the capacity of each homeroom, whether created individually or through mass creation, to ensure that the total number of seats entered in each homeroom does not exceed the school's license capacity. If you need to exceed the number of seats in homerooms beyond the license capacity, you must select "Bypass School Capacity" on the "School Configuration" screen. Please note that admitted Autism Resource Base (ARB) students will be excluded from the school's capacity counter.
2.2.1.6.2. Editing Homerooms
- Sign in to eSIS.
- From the left-side menu, select "Schools".
- Expand the menu under "Schools" and click on "School Details".
- Choose the target school from the list of schools.
- Navigate to the "Homerooms" section.
- Select the desired homeroom.
- Edit the details of the desired homeroom.
- Click "Save" to save the changes.
2.2.1.6.3. Deleting Homerooms
- Sign in to eSIS.
- From the left-side menu, select "Schools".
- Expand the menu under "Schools" and click on "School Details".
- Choose your school from the list.
- Navigate to the "Homerooms" section.
- Select the desired homeroom.
- From the top-right corner, click on "Delete".
2.2.1.6.4. Mass Creating Homerooms
- Sign in to eSIS.
- From the left-side menu, select "Schools".
- Expand the menu under "Schools" and click on "School Details".
- Choose your school from the list.
- Navigate to the "Homerooms" section.
- Click on "Upload Homeroom Information".
- Upload the pre-filled template, then click "Save".
This feature can be used to both add new homerooms and edit existing homerooms.
2.2.1.6.5. Assigning Students to Homerooms
- Sign in to eSIS.
- From the left-side menu, select "Schools".
- Expand the menu under "Schools" and click on "School Details".
- Choose your school from the list.
- Navigate to the "Homerooms" section.
- Click on the "Used Seats" link to view the students assigned to this room.
- To add new students, click on "Add". To remove students from the homeroom, click on "Delete".
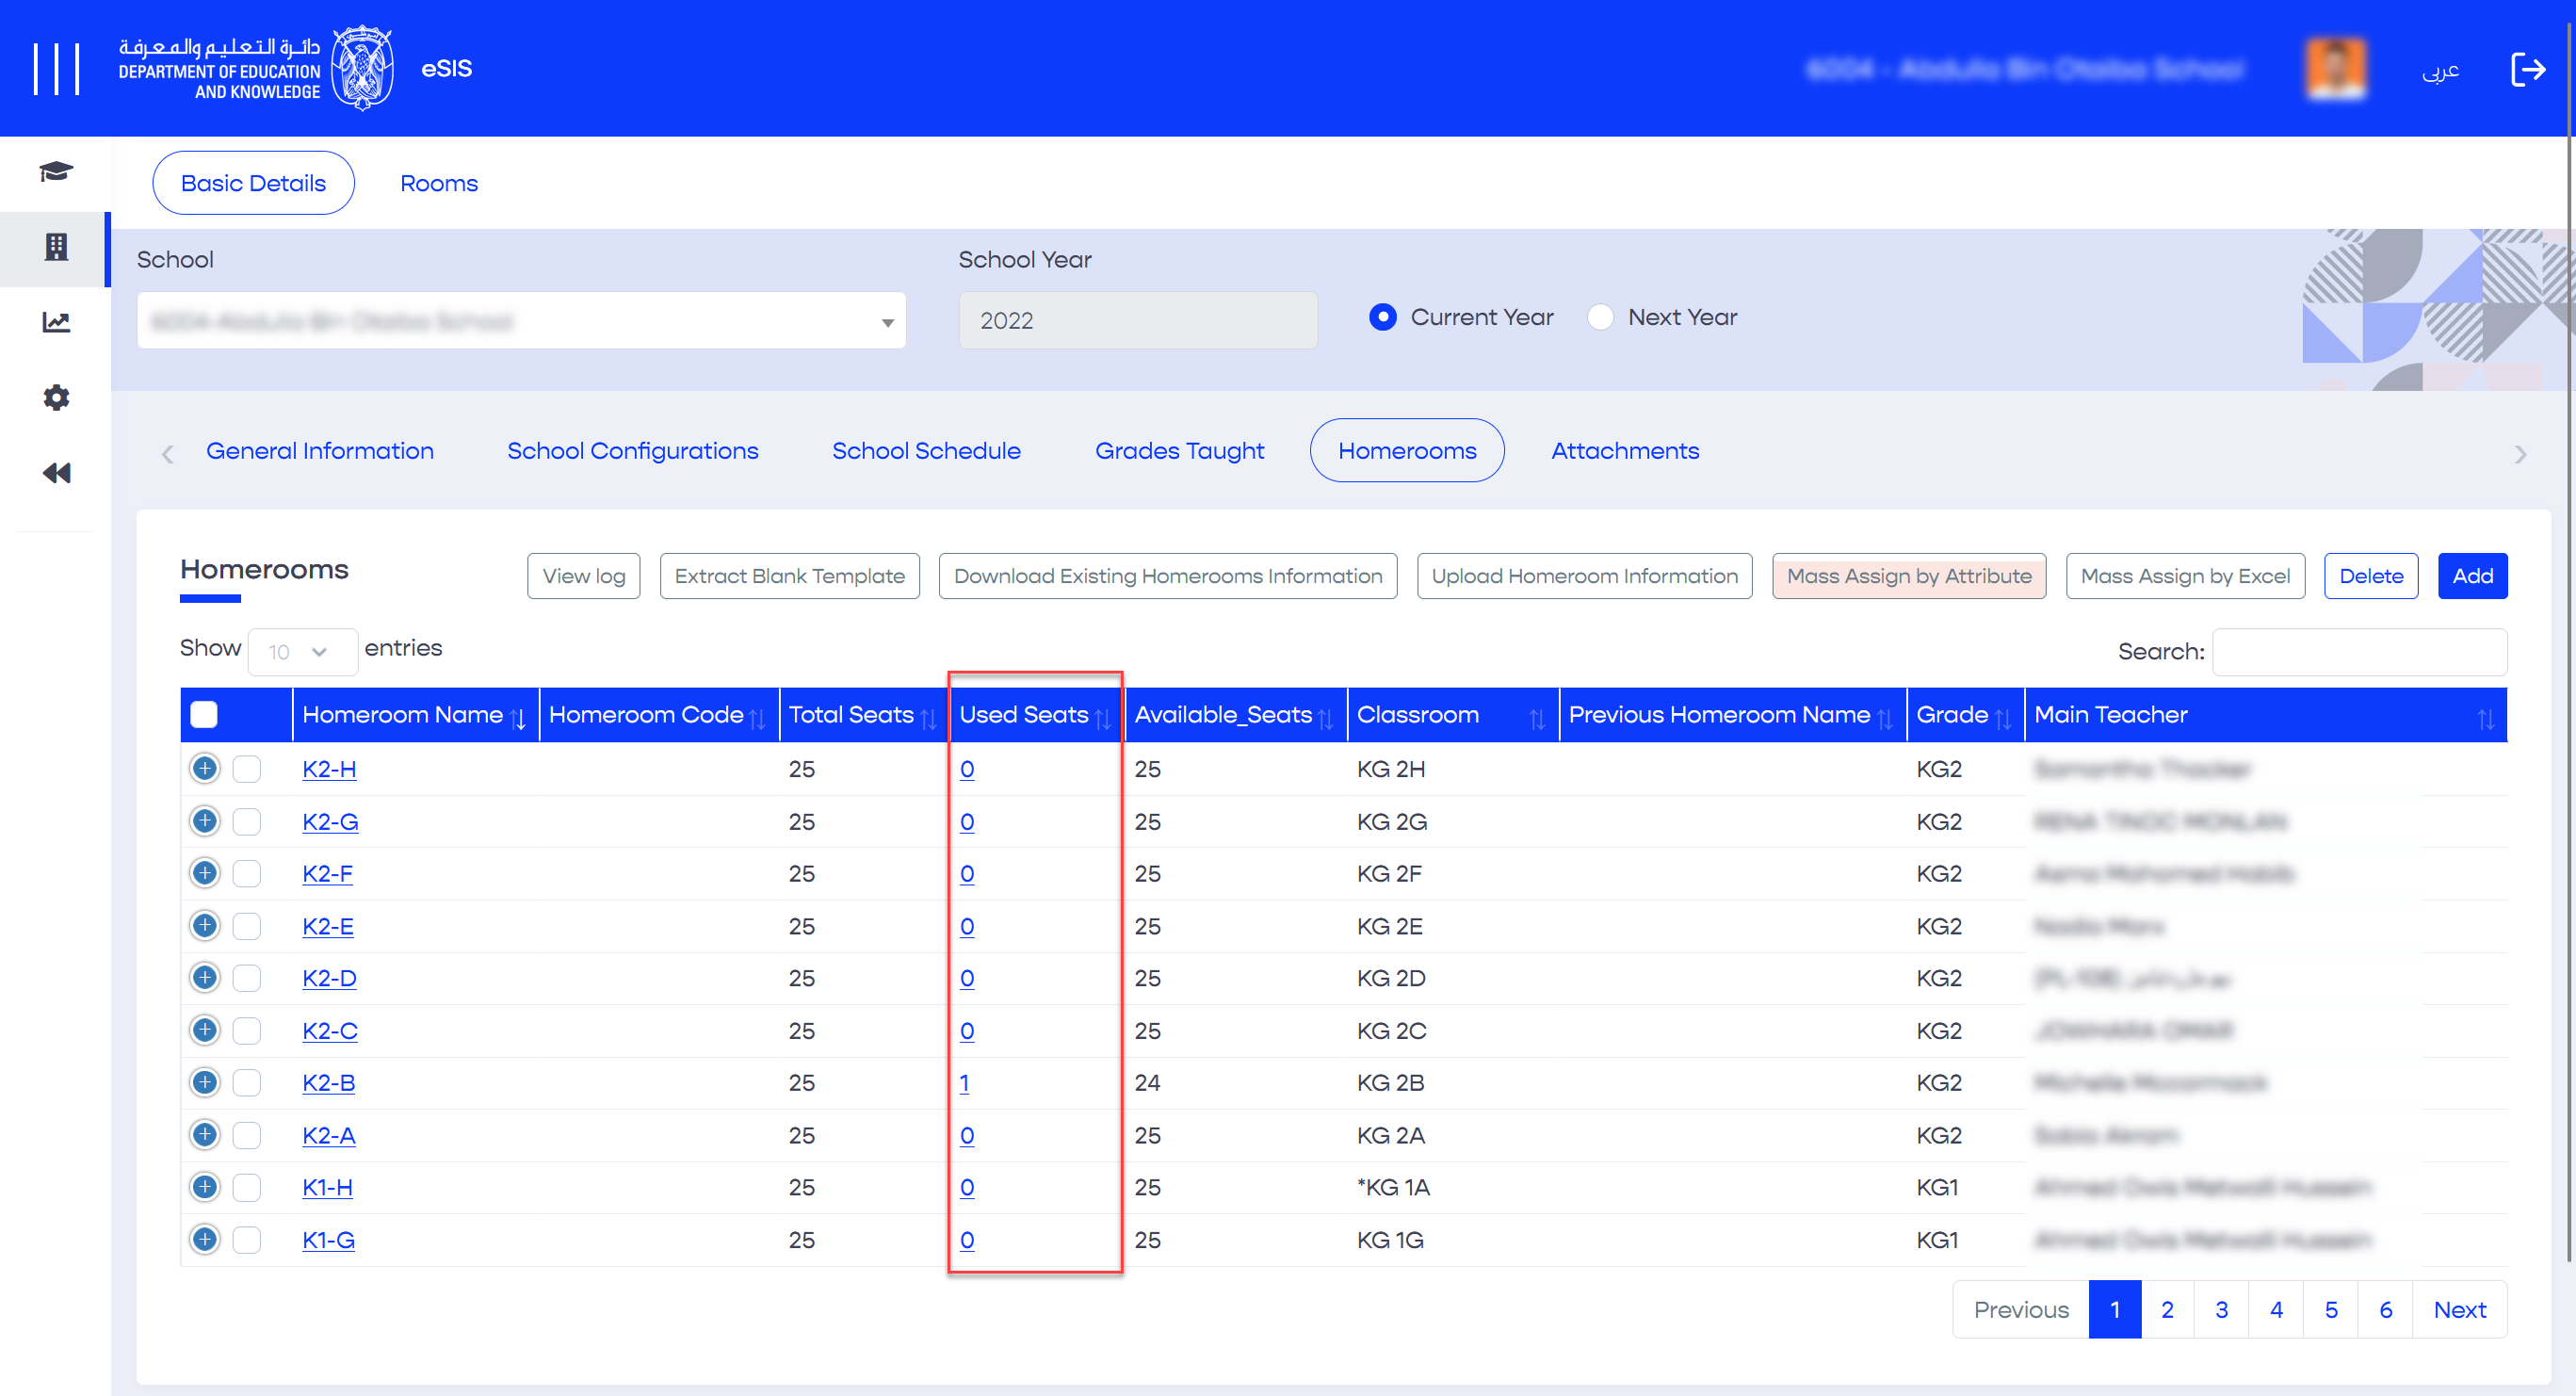
Info
Schools can only assign students without a homeroom to available homerooms. If students already have an existing homeroom assignment, it cannot be reassigned or deleted.
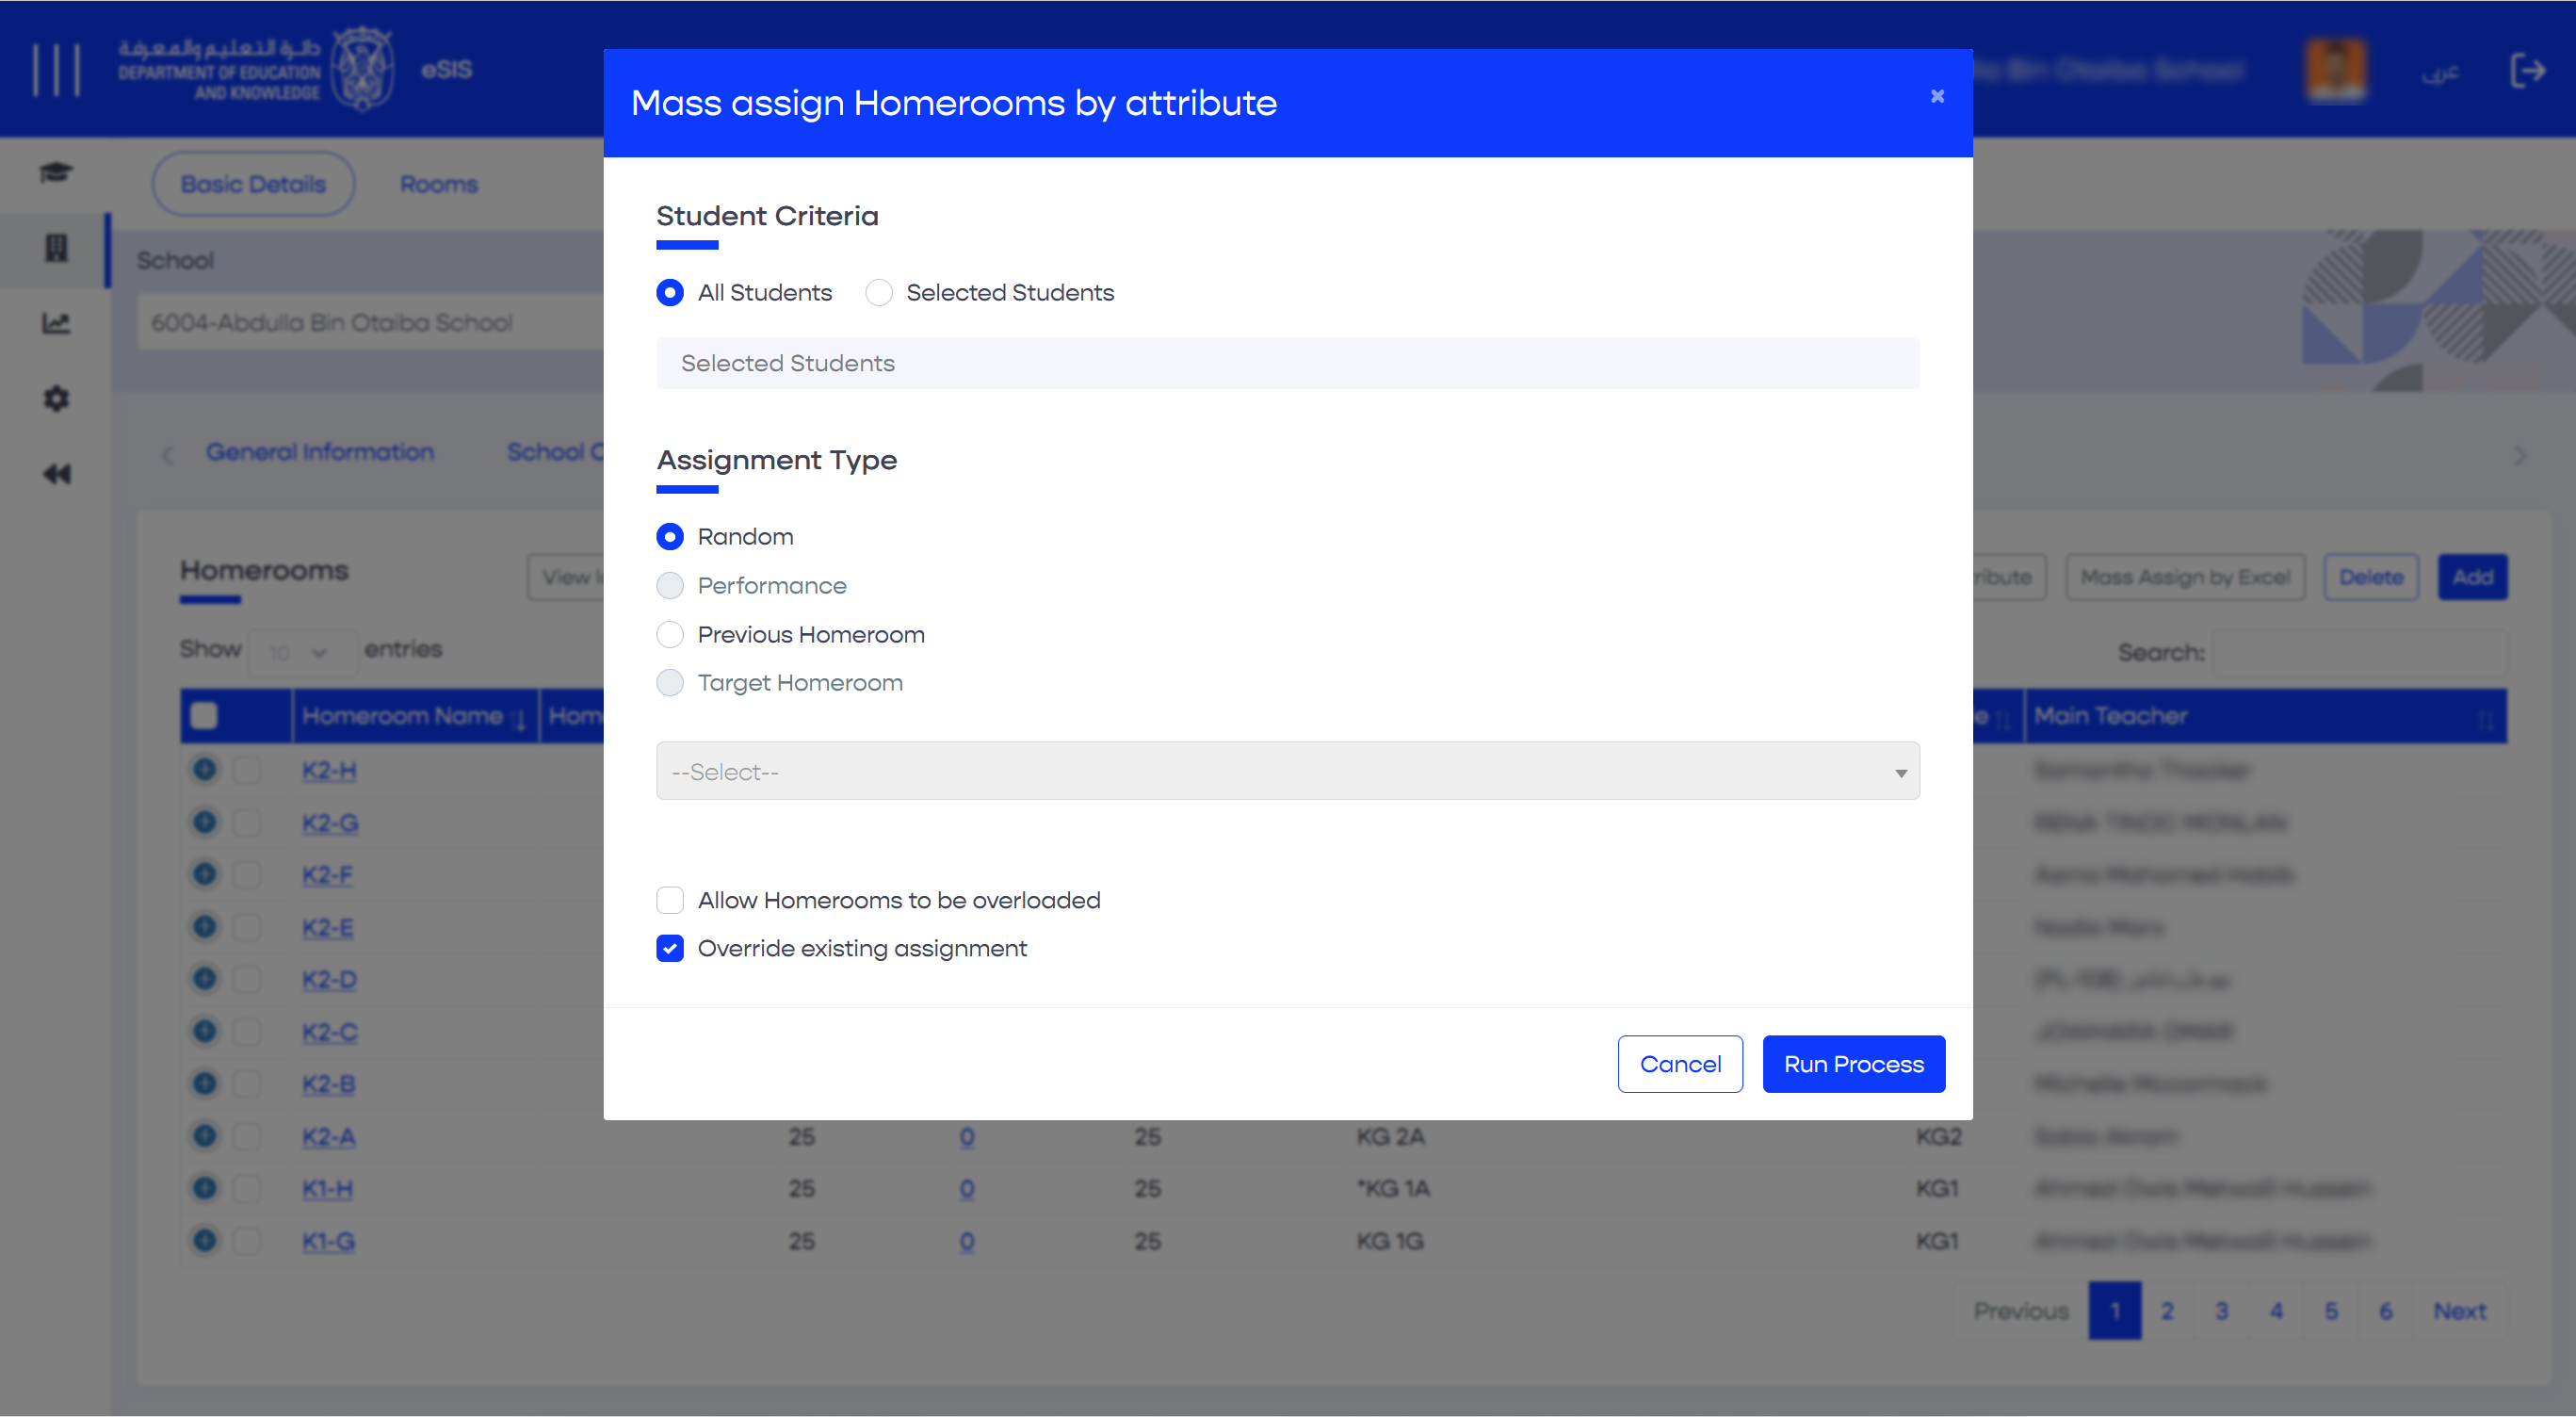
2.2.1.6.6. Mass Assigning Students by Attribute
The "Mass Assign by Attribute" feature allows you to search and filter students based on specific attributes (such as homeroom, grade, etc.) and assign them to homerooms in bulk.
- Sign in to eSIS.
- From the left-side menu, select "Schools".
- Navigate to "School Details" and click on "Homerooms".
- Click on the "Mass Assign by Attribute" button.
- A popup will appear where you can choose to assign either "All Students" or a specific group of students. Select the appropriate assignment type.
- Click on the "Run Process" button to initiate the mass assignment.
2.2.1.6.7. Mass Assigning Students by Excel
This feature allows you to search for students, download their information as an Excel file, make necessary edits, and upload the updated file.
- Sign in to eSIS.
- From the left-side menu, select "Schools".
- Navigate to "School Details" and click on "Homerooms".
- Click on the "Mass Assign by Excel" button.
- Define the criteria for the Excel format by selecting the Grade, Gender, Religion, Ethnicity, and Program Type.
- Click on "Extract Blank Template" to download the file.
7. Fill out the exported template.
8. Repeat Steps 1 to 4.
9. Upload the file.
10. Click on "Import and Mass Assign".
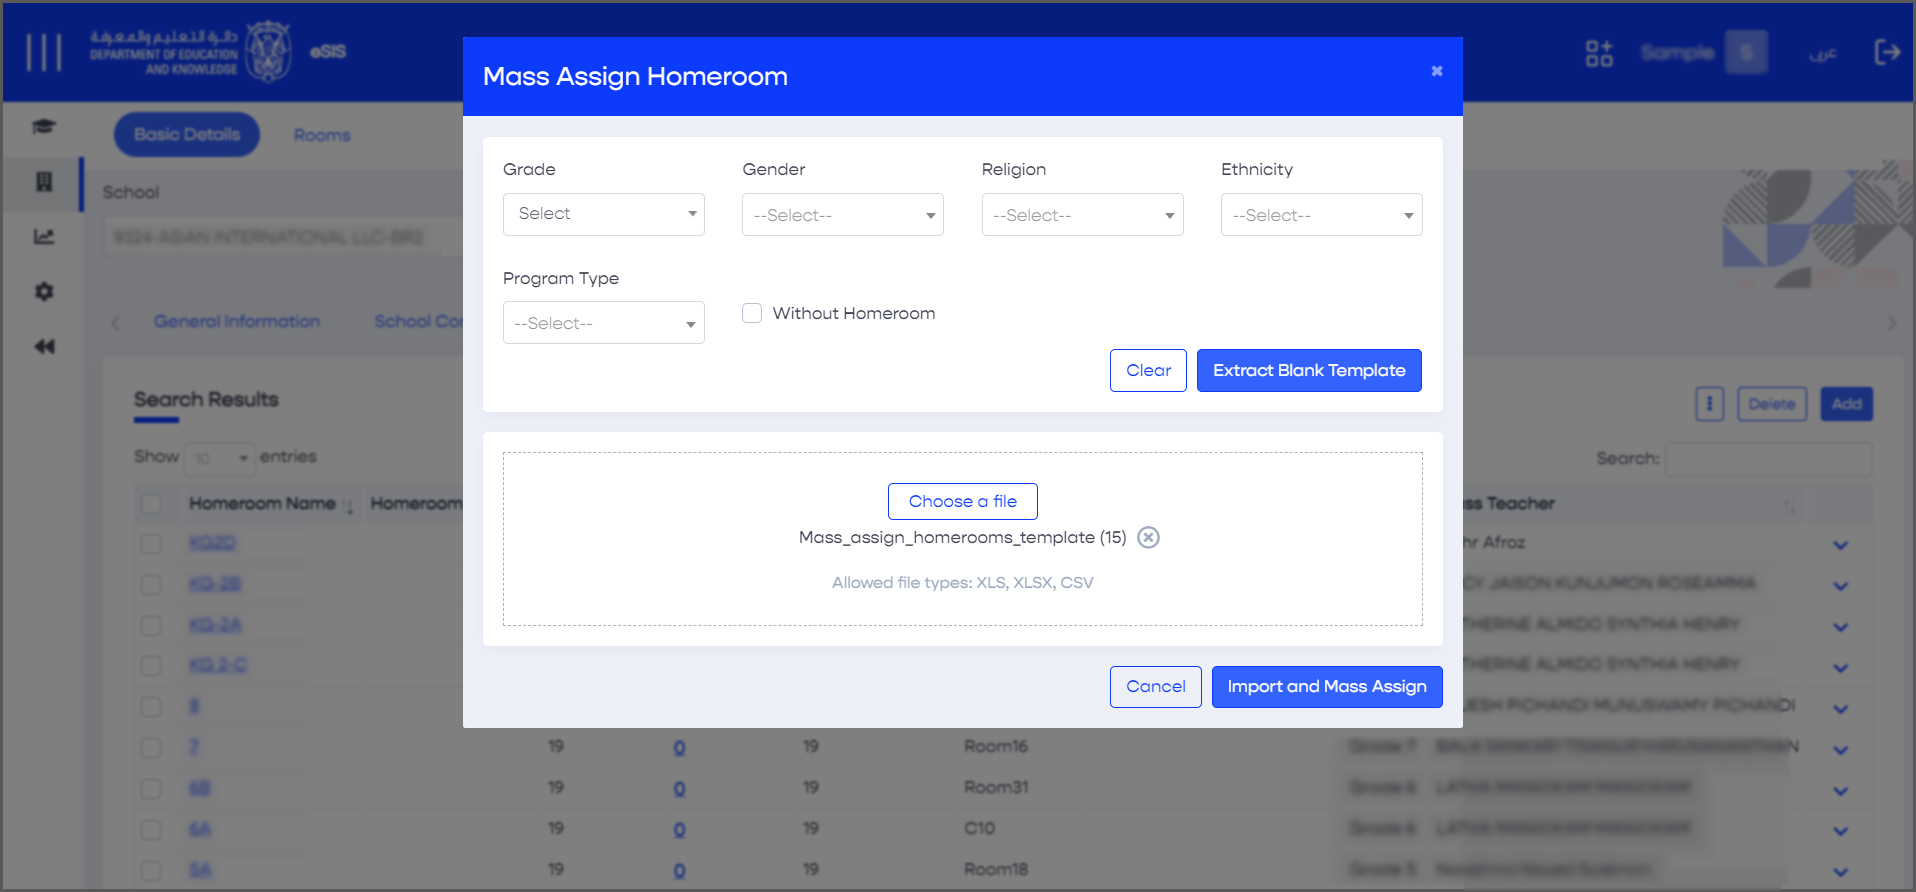
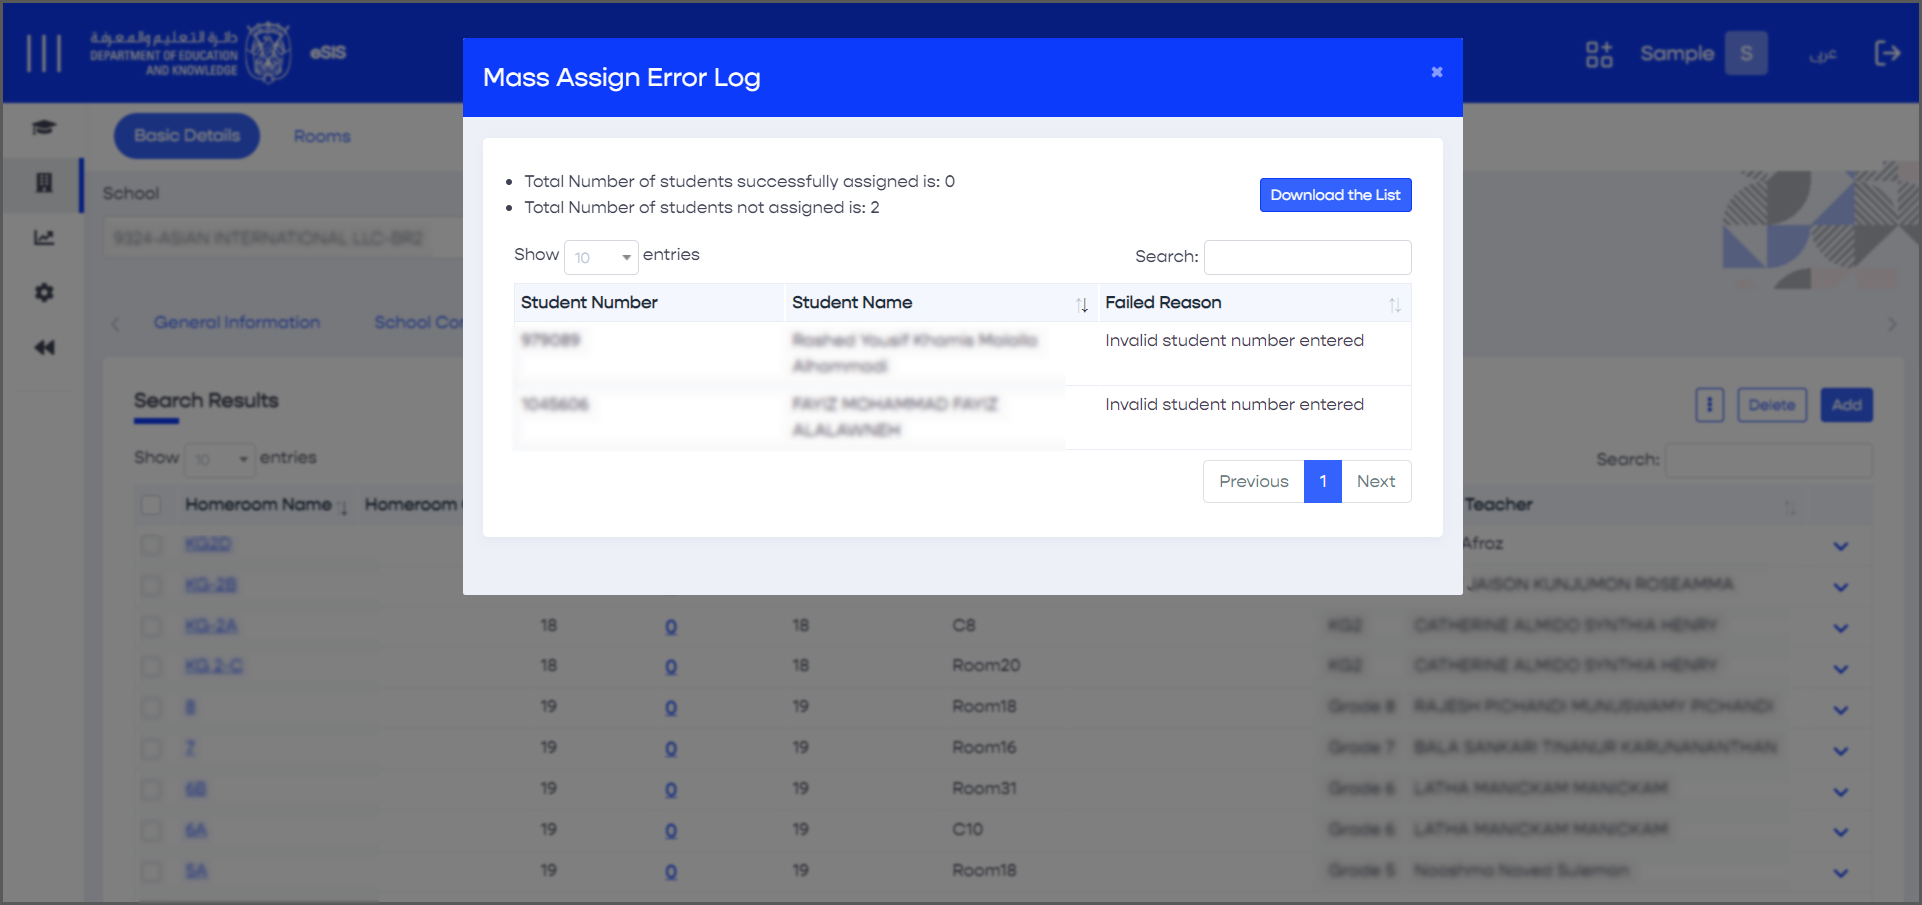
If the uploaded file does not meet the field requirements and contains invalid values, an error message will appear. In such cases, please make the necessary adjustments and re-upload the file.
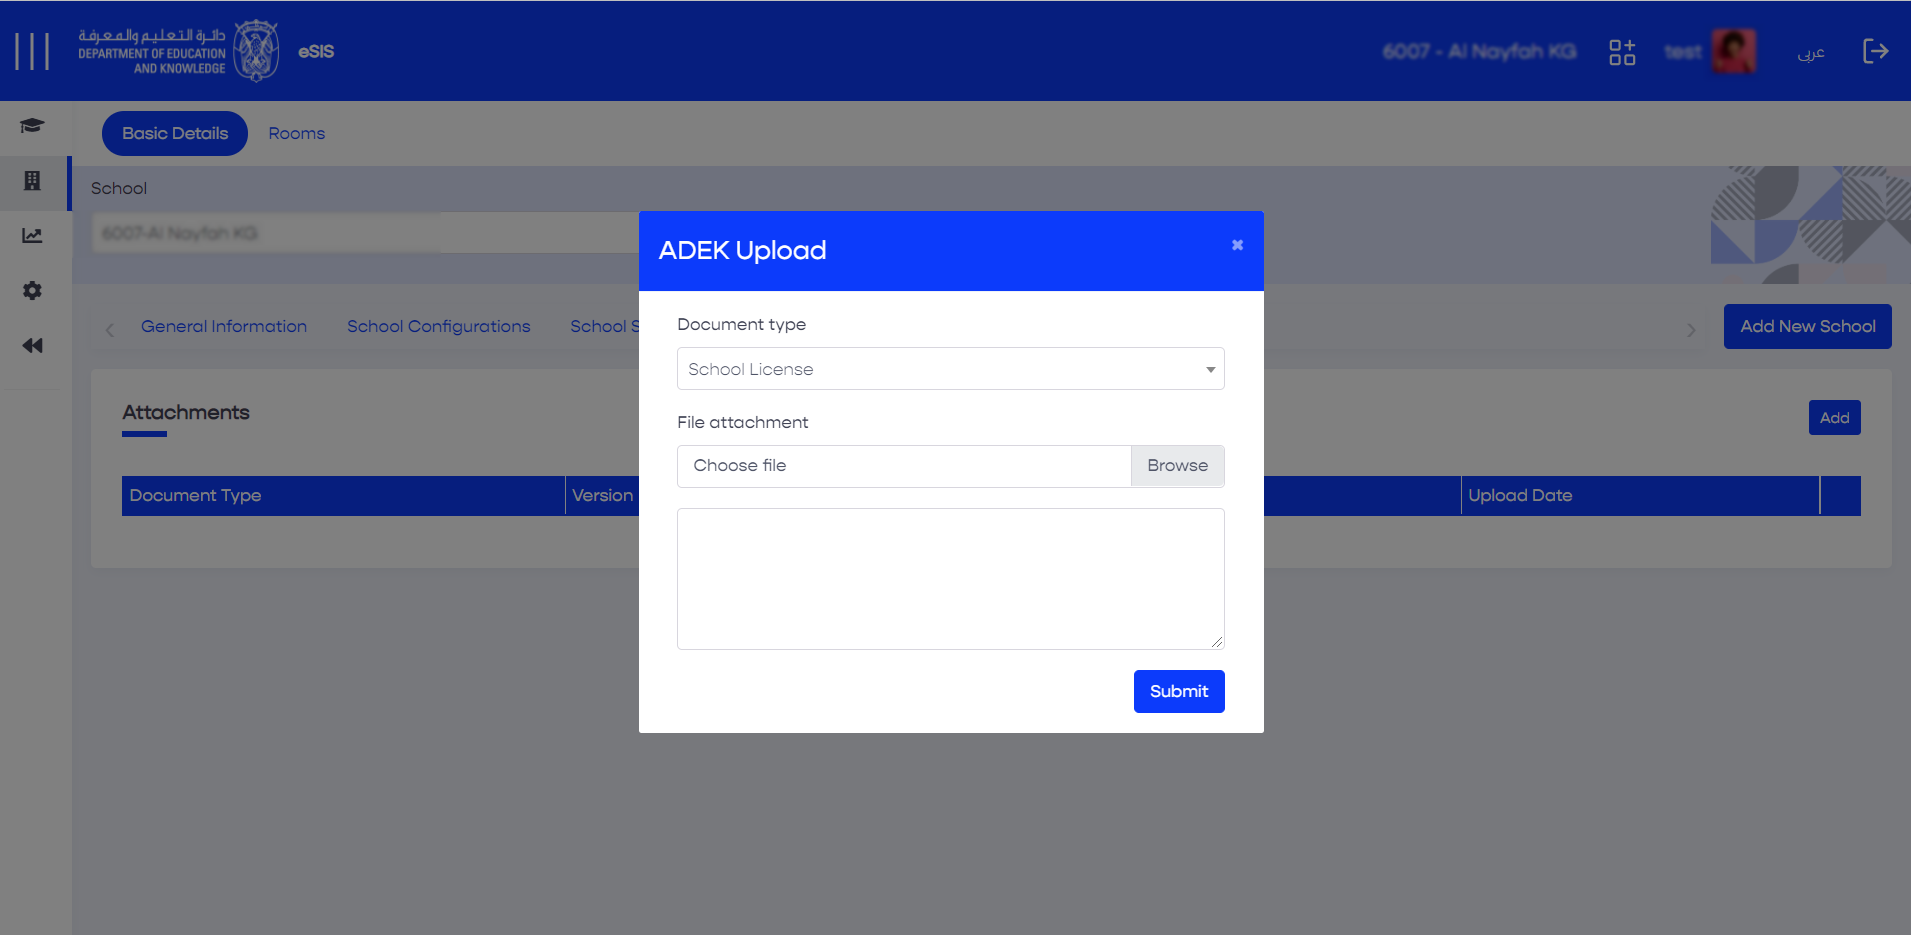
2.2.1.7. School Attachments
2.2.1.7.1. Adding New Attachments
- Sign in to eSIS.
- From the left-side menu, select "Schools".
- Expand the menu under "Schools" and click on "School Details".
- Choose your school from the list.
- Navigate to the "Attachments" section.
- Click on "Add" from the top-right corner.
- Select the document type and upload the document.
- Click on "Submit".
2.2.1.7.2. Deleting Existing Attachments
- Sign in to eSIS.
- From the left-side menu, select "Schools".
- Expand the menu under "Schools" and click on "School Details".
- Choose your school from the list.
- Navigate to the "Attachments" section.
- Select the desired attachment.
- Click on "Delete".